Today on Love and Lavender we have a special guest. Patricia Hall is a florist and she is going to explain how to make a wedding bouquet in 6 easy steps!
Weddings are beautiful but potentially expensive affairs. One popular way that brides save money is by making their own bouquets. Each of the bride’s and bridesmaid’s bouquets can cost anywhere from $50 to $200 per bouquet. To avoid the expense of a quality bouquet or the disappointment of skimping on quality for price, many brides choose to make their own bouquets. Keep reading to learn how to make a bridal bouquet below.

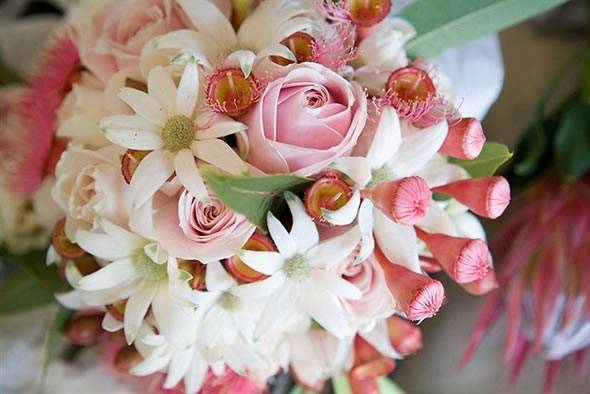
(image source: http://www.abiaweddings.co.za)
DIY bridal bouquets not only save money, but they save time. Brides can have fresh flowers delivered directly to their home without having to take time out of their day to visit a florist. This delivery of flowers in its entirety is available fresher and cheaper than pre-made bouquets ordered directly from a florist.
How to Choose Flowers for a Wedding Bouquet
Choose your flower color freely. The traditional choice for most weddings is white. But brides should not feel constrained by formality. Recent trends embrace wedding flowers of all colors. Red roses, calla lilies or even poinsettias are popular for evening and winter weddings. For spring and fall weddings, bouquets of many colors make any bridal procession pop.
Many brides choose to make their wedding bouquets out of their favorite flower, birth flower or a flower that has special significance to the couple. Other brides choose to have fresh flowers delivered for their bouquet because they can choose the flowers that match their bridesmaids dresses or their wedding colors.
Contrasting colors are another popular choice. For example, pink flowers look beautiful with pink bridesmaids dresses. But blue flowers — on the opposite end of the color spectrum — attract more attention. Whether brides choose sentimental, contrasting or matching colors, purchasing a delivery of flowers allows custom bouquet in any single or variety of shades.
Brides may also play around with the color combination of the ribbon and the flowers. The traditional ribbon color is white. The pop of white against the green stem ties any bouquet into a dress. A ribbon that matches the shade of the bridesmaid’s dress will do the same.
But a bride can choose virtually any color for her ribbons. Green makes a bouquet look as if its stems are natural and not wrapped at all. The bouquet ribbon can also match the flowers themselves. Choose a ribbon that matches the color of the blossoms for uniformity. If there is a variety of color in the bouquet choose a ribbon that matches any of the flowers. Whichever color you match will make the corresponding blossoms pop.
No matter the blossom or ribbon color, restrict your delivery of flowers to long or medium-stems. To make the bouquet easy to hold you’ll need ample stem length to grip. The longer the stems the more elegant the bouquet. It is easier to trim down long stems from the fresh flowers delivered than to lengthen short stems or secure them to a bouquet. Tell your florist to leave you with as much length as possible. If the flowers you love grow in clusters, purchase the entire stalk or spray. Long flowers look beautiful cascading down from the front end of a flower bouquet.
Always purchase more flowers than you think you will need. Fresh flowers delivered and in hand may inspire new ideas or additional bouquets. First time bouquet makers may make mistakes or change their minds. Extra flowers allow for last minute changes without a last minute delivery of flowers.
(image source: https://www.i-do.com.au/editorialpics/top10/Flowers/bouquetsGarlandsFlorist1.jpg)
How to Make A Bridal Bouquet For Your Wedding
Supplies you will need to make your bouquet:
- Fresh flowers delivered
- Flower tape
- Thick ribbon
- Crystal-headed pin
- Hairspray
Step 1 – Remove the delivery of flowers from their package
Discard any flowers that are damaged or discolored. Use a clean pair of pruning shears to cut off the leaves on the stems at the base of the leaf stem where it meets the flower stem. Discard all of the trimmings or scatter them on top of your compost pile.
Step 2 – Gather four or five blossoms
Hold the blossoms on their stems just below the blossom head. In general, the largest blossoms look best in the center of the bouquet. Next, gather blossoms two or three at a time to build out the bouquet. Retain a secure but gently grip on the stems just below the blossoms.
Step 3 – Finish the bouquet with an outer ring
Large or small leaves give the bouquet a rustic look. Flowers work beautifully. Make the outer ring slightly lower — about 1/2-inch — than the main bunch. Angle the heads so that they face slightly out instead of straight up. Attach any cascading leaves or flowers to the front of the bouquet as a last step. Keep a firm grip on the bouquet while making the additions.
Step 4 – Wrap flower tape around the stems
Start roughly one inch below the flower heads. Spiral the tape around and around the stems until you reach a point roughly 2 to 3 inches above the ends of the stems or wherever the ribbon will end.
Step 5 – Wrap the ribbon around the flowers
Start one-third of the way down the stem. Wrap the ribbon up towards the blossoms. Overlap the spread of the flowers — where the stems begin to bend outward — by 1/2 inch. Then wrap down to the base of the flower tape. Secure the end of the ribbon with a crystal pin inserted into the stems.
Step 6 – Spray the flower heads with hairspray
Spray with hairspray and let dry for a few minutes. Fill a vase with enough water to cover the stem ends, but not the ribbon just above it. Place the bouquet in the vase until the wedding day.
Источник: www.loveandlavender.com